Update your bare walls this weekend with three easy projects.
Start by creating a gallery wall with frames and photos—lay everything out first, pick one anchor photo for eye level, then build outward using painter’s tape to mark spots.
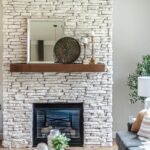
Next, hang mirrors in different shapes and sizes near windows to bounce light around and make rooms feel bigger.
Finally, choose one bold focal point as your centerpiece and layer coordinating items around it for a polished look. Read on to discover exactly how to nail each technique.
DIY Gallery Wall With Frames and Photos (30 Minutes)

Creating a gallery wall might sound intimidating—like you’ll need a degree in interior design and a whole weekend to pull it off—but here’s the truth: you can actually nail this in about 30 minutes if you’ve got some frames and photos lying around.
Start by laying everything on the floor first to plan your arrangement. Pick an anchor piece—your main photo—and position it at eye level, then build outward from there. A grid layout or salon-style arrangement maximizes your wall spacing without looking cluttered.
Use painter’s tape to mark frame positions before you hammer anything. Mix different photo sizes within matching frames to add visual interest while keeping that unified look. Hang from the center outward, and you’ve got yourself a project that looks professionally designed.
Brighten Your Space With Mirrors as Decor (45 Minutes)

Why does your room always feel a bit gloomy, even when the sun’s streaming through the window? Mirrors bounce light around, making cramped spaces feel bigger and brighter—it’s like adding invisible windows to your walls.
You’ll want to grab mirrors in different shapes and sizes for that eclectic gallery wall vibe. Lean them against shelves, hang them near windows, or cluster them together for maximum light reflection. Mix your mirrors with surrounding art to create a cohesive display that pulls everything together.
Here’s the important part: safety mounting matters. Secure everything properly so nothing crashes down unexpectedly. This weekend project takes about forty-five minutes and turns dingy corners into bright, welcoming spots where you’ll actually want to hang out.
Start With One Bold Statement Piece and Layer Around It (2–3 Hours)

How’d you like to actually finish a wall project without it looking like you threw everything at it and hoped something stuck?
Start by choosing one bold centerpiece that matches your room’s colors and style, then build around it. This focal piece anchors everything, making layout planning way easier.
Next, plan at eye level—seriously, measure it out. Leave consistent spacing between items to avoid that cluttered mess. Your gallery wall and smaller accessories should feel deliberate, not random.
Keep your initial investment small: one dominant piece plus a few coordinating items. This affordable decor approach makes your quick DIY doable in a weekend. Quick-display elements like floating shelves introduce depth fast.
The result? A cohesive layout with balanced visual weight and professional-looking wall decor layering that actually impresses people.